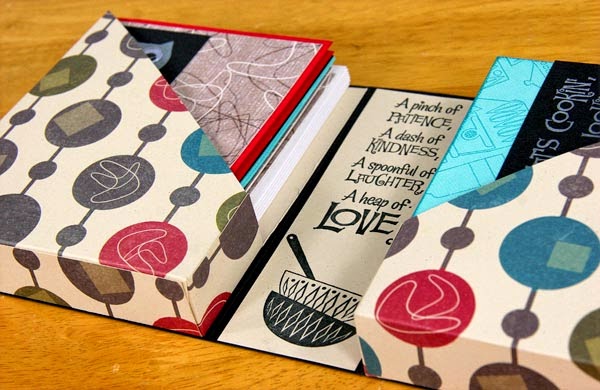
My personal challenge was to make something practical to hold the dozen-ish cards I create each month with the Club Stamp paper pack. By the time you add envelopes, it's a nice-sized stack that deserves a good home.

Just perfect for gifting!


Not knowing if it was going to turn out, I didn't take any "step-out" photos along the way, but with the help of the following directions, a few sketches and Kay's beautiful images, I figure you can create one quite easily.
New Update: I have a video tutorial for you and more examples HERE.
1. Trim two 12x12 Tan Prints from the Lite kit to 6.75x12".
2. Score one 6.75x12 Tan Print horizontally at 1, 5.75, 6.75 and 11.5". Rotate the paper 90 degrees to the right, and score at 1".

3. Score the other 6.75x12 Tan Print horizontally at .5, 5.25, 6.25 and 11". Rotate the paper 90 degrees to the right; score at 1". (Note: This mirrors the scoring in step two.)

4. Use a scissors to cut darts within the 1" scored area at the bottom of each piece as shown in the diagrams. Cut along all remaining solid lines with a ruler and craft knife. The angled lines end 4" from the top edge of the paper. Carefully confirm the location of the 1" and 1/2" tabs as indicated in the diagram to successfully create the "mirrored" pockets.


5. Fold along all score lines and adhere tabs to create the angled pockets. Place the 1" tab on the outside of the pockets.

6. Trim a sheet of 12x12 Black Plain to 5-7/8x12". Score horizontally at 4-7/8 and 7-1/8". Fold along score lines to create the outside of the carrier. If your scoring tool does not have 1/8" measurements, simply measure and mark with a ruler; align the marked spot with a groove on the board and score.

7. Adhere the pockets to the inside of the carrier, flush with the bottom edge of the paper and resting directly next to the inner score lines.
- (2) 4.5x5.5" Red Plains - outside cover
- (2) 4.25x5.25" Tan Prints - outside cover
- 2x5.5" Red Plain - outside spine cover
- 1.75x5.25" Tan Print - outside spine cover
- 2x5.75" Tan Print - inside spine cover
9. Insert cards into the pockets, close the carrier and create a band closure with two connected 1x10" strips of Black Plain.

10. Decorate further with stamped images, nested die cut shapes, etc.


Now that my cards have such a happy home, I figure this will be "volume one." Wouldn't a whole series of these made with different kit designs be absolutely adorable?

And you're off to see what Marya is cooking up next at A Notebook Novel. Thanks for your visit!
Tricia

Wonderful project! thanks so much for sharing how you made it.
ReplyDelete:) Marie
Wonderful project! thanks so much for sharing how you made it.
ReplyDelete:) Marie
This is just gorgeous - I know that I will be making lots of these. Thank you for coming up with such a terrific gift idea.
ReplyDeleteAnother of your great gift ideas, Tricia.I am going to try and make one too. Nice new picture of you!
ReplyDeleteWhat a fun project! I love that it's practical but still a really fun gift idea.
ReplyDeleteTFS Tricia!
LOVE IT! I wanna make one!
ReplyDeleteSuper cute! Now I have to order the Lite kit to get more paper to make this! LOL! Have a great day Tricia!
ReplyDeleteWhat you didn't take pictures as you went? =) It turned out great though and it would make a nice gift, if I happened to have any space Club Stamp kits waiting around to be made up...oh wait...
ReplyDeleteLOVE LOVE LOVE it!! Tricia thanks for all the great directions! Love all your projects. So cool.
ReplyDeleteGreat card holder! Thanks for the instructions--I think this one will be a gift-giving project in my future.
ReplyDeleteVery Pretty! Such an excellent idea!! Love, Love, Love your work - thanks, Denise
ReplyDeleteVery, very nice! Maybe a video in our future....hint! hint!
ReplyDeletethanks Tricia! I love these projects in which to store/gift-give cards! thanks!
ReplyDeleteI've always thought a gift of handmade cards is a great idea, so having another awesome way to store and present them is definitely welcome. Love it!
ReplyDeleteGreat card holder! Love having a new way to give away handmade cards.
ReplyDeleteMarvolou. Love words in the middle. Thanks for the ideal.
ReplyDeleteI love it. I particularly like the notion of creating a volume based on each month's kit. A great idea. Oh, would there were enough hours in each month!
ReplyDeleteUmm..Tricia...what envelopes? Club Stamp doesn't come with envelopes. Can you make that happen for a couple of extra bucks? Just a thought.
ReplyDeleteHi! I went to confirm that we have our 25-packs A2 of envelopes available, and it turns out they were out of stock. They are back online and available today! http://www.clubscrapshop.com/store/p/3904-A2-Envelopes-25-pk.aspx
DeleteWhat a great idea! This would be a great addition to my gift "stash"!
ReplyDeleteAwesome. A video, pretty please?
ReplyDeletePerhaps I can do a video for my second edition with the new Botanicals kit! :)
DeleteI love your project and thanks for sharing directions
ReplyDeleteLove this - Maybe I need to make up some cards as presents!! fun fun fun!!
ReplyDeleteI am *SO* stealing this to keep me going on my backlog of GTG! Thanks for this :-).
ReplyDeleteAbsolutely Awesome!! Right up my alley! Thanks so much! LOVE the idea of using each kit this way.
ReplyDeleteI always love getting to photograph your awesome projects, certainly a pleasure. While doing so, I always hope your brilliant, really cute but also practical crafting skills rub off on me!
ReplyDeleteYou always have unique projects to share. Thank you for the details in making this project...very user friendly.
ReplyDeleteThis comment has been removed by the author.
ReplyDeleteYou might want to number this #3, assuming you want to start the year in January to have a year's worth of volumes. I'm going to check my stash to see if I have enough paper from Constellations and London Calling left to do this. What a great project this will be! Thanks again, Tricia, for the best ideas!!
ReplyDeleteI also decided to use the other print from the CS lite kit. The black embellishments just seemed to go better with that abstract print. And I tend to like abstracts better in general. Not that I didn't like the paper you went with. I just wanted to try something different. The switch worked well as I'm sure any paper from the 50s Kitchen Collection would! I can't get enough of that kit!
ReplyDeleteI'm so glad you went with your creative muse to make one of your own. That's wonderful!
DeleteI'm not having problems but I just want to make sure: in the cutting diagrams, the areas that are Xed out are meant to be cut out completely--yes? At least that's what I've decided to go with.
ReplyDeleteYes, all areas with the "x" are to be removed, including the angled area on each pocket, as well.
DeleteActually, Tricia, I made so many cutting errors that I couldn't use the White Print from the Lite kit either. The final version used the print from the CS Deluxe kit with the "columns" of cups, sugar bowls, glasses, etc., in different colors. I didn't intend to match the figures in the two papers but when I put them together they were a pretty close match. Then because I dislike those band closures (hard on the band and on the material you have to drag the band over to open the project), I added and eyelet/washer toward the right rear and tied inside a black suede cord that I used to wrap around the entire carrier. It closes by wrapping the cord a couple of times in the front and I added a charm to help it stay closed. Finally, since I hope to go back and prepare two for Constellations and London Calling, I numbered this card carrier #3 (for March) and will assign antecedent and subsequent numbers accordingly. I'd like to post some pix but I'm having trouble uploading to your server. It's my fault, not the fault of your system. The pix go from my phone to my computer but an image is given a long, indescipherable name and I can't even find the file by date. So I hope to have this process running more frequently in the near future!
DeleteDon't know whether my other, longer post will appear. Hope so. Hope it wasn't critical. I forgot to add that I also included little magnets on either side of the opening to keep the sides from flopping open. Those little things are strong but I let them set in adhesive over night and so far so good!
DeleteLove this project and I have a stash of papers I could make these in.
ReplyDeleteThanks
Thanks for the video...I just saw this and it is what I was looking for...many thanks
ReplyDeleteThanks for sharing this . What a nice idea for storing your cards.
ReplyDeleteI love this tutorial and have made one for each holiday/occasion then gifted them with cards inside to my Mom. She loves them as well. I'd love an SVG file for this to cut on a Cricut...has anyone done that?
ReplyDelete