
Welcome, Homestead Hoppers! To start at the top of the hop, visit our wonderful host, Club Scrap.
I set out to create something with the clever stencil/stamp combo Jacqueline designed for this beautiful kit. Since day one, Jac had a vision for how the smaller label/frame image from the Collection UM could work like a "ribbon slide thingie" on a page.
The blog hop gives me one more chance to make work of ideas like this . . .
1. Use a grid ruler and pencil to mark a guideline about 1.5" from the edge of a 12x12 Ivory Plain. Mark the center and 2" above and below center until reaching the edges of the page. (This measurement is based on the size of the stamp . . . a little less than 2".)

2. Center the stamp onto an acrylic block with an etched grid. Align the vertical and horizontal center of the image onto the horizontal and vertical pencil guidelines to stamp a perfectly spaced border with India Black ink.

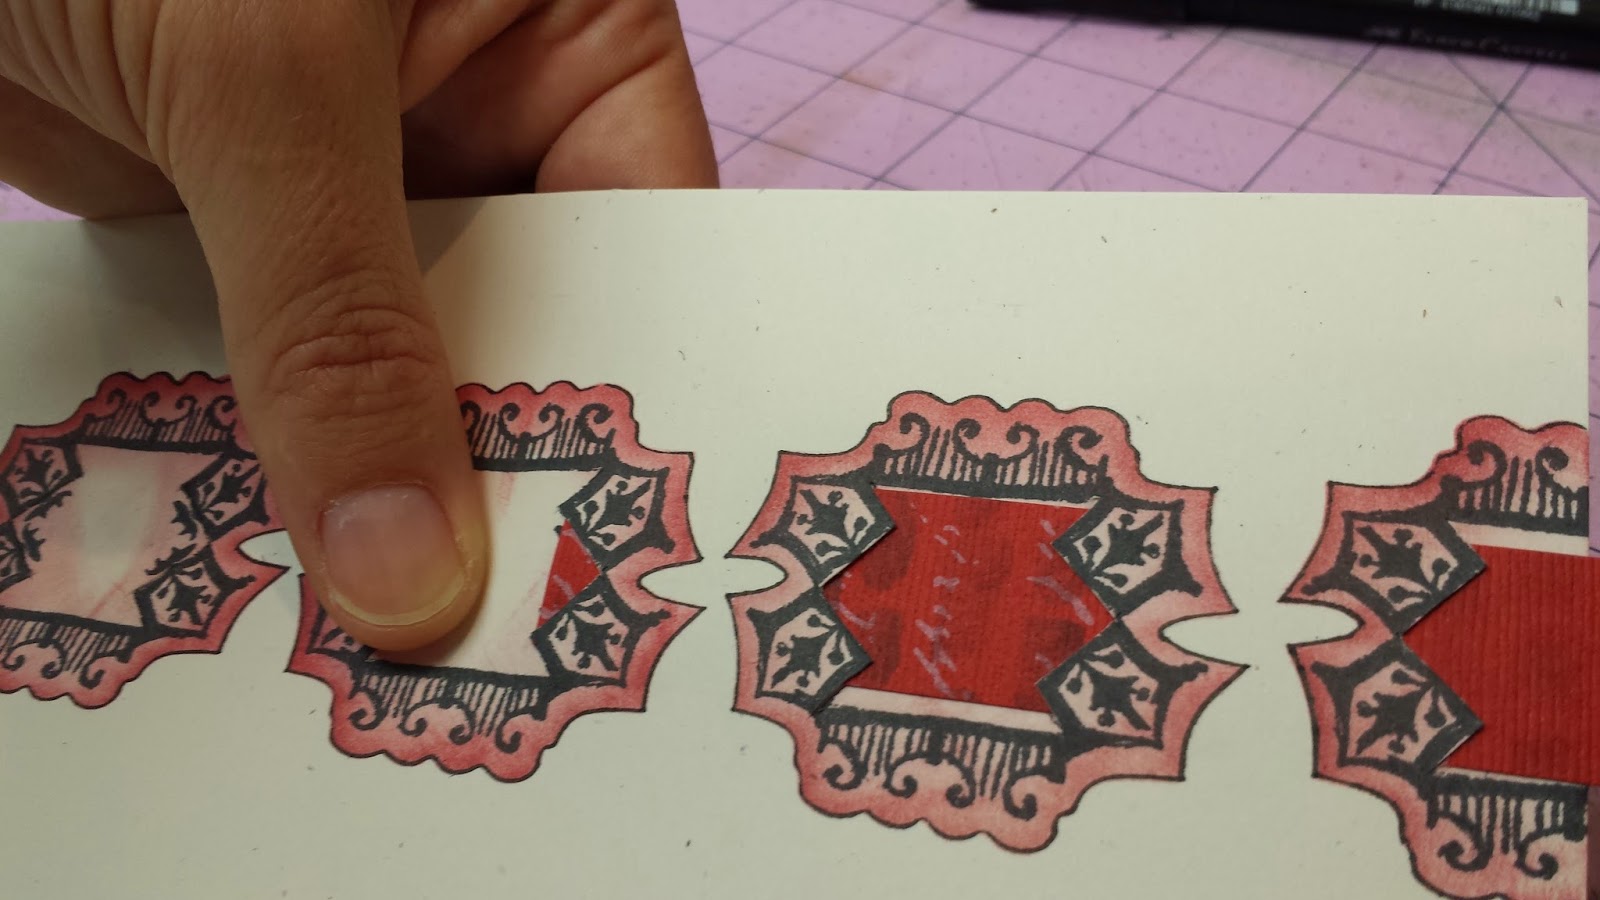
3. Use a quality eraser to eliminate the guidelines. (Don't use a nasty eraser that leaves horrid black marks all over the paper.)

4. Use the Homestead Lite Framed Stencil, ink applicator and Ruby ink to add the corresponding frame around each image. Do not fill in the entire area . . . simply ink the edges and lightly toward the center of the frame.

5. Outline the edge of each stenciled frame with a fine-tipped black marker. (You can do this during the stenciling process or realign after creating the inked frames.)

6. Cut slits within the "window" of the stamped image with craft knife and cutting mat. TIP: When working with a craft knife, always rotate the paper to ensure you are cutting in the most comfortable position possible.

7. Slide a 3/4" strip of paper (or ribbon) in and out of each slit.
(The view from the back of the paper.)


8. Use the corner swirl image to add a border to the three unadorned edges of the paper with Earth ink. TIP: Use the full image to create the corners, flipping the stencil as needed. Use only part of the image for the center areas of the border.

9. Add photos, stamped images, and embellishments to finish the page. If desired, trim 1/4" from each outside edge of the 12x12 Ivory Plain and layer onto the 12x12 Green Print. I found photos from the 2014 Retreat's "Lady in Red" night worked beautifully with this collection. Say "hi" to Julie and Brenda, CS staffers extraordinaire!

Special thanks to Kay Williamson for adding the cool overlay to the Retreat guest photos this year. It's so easy to keep track of the year with the "Retreat 2014" label on the lower left corner of the image.

Distress the edges of the Green matte to create that "Homestead" look.

The look is so dimensional with the stamping, stenciling and "paper ribbon."
I hope you give the stencil/stamp combo a try! Next stop on the tour . . . Hetty's Craft Chaos across the pond in the Netherlands!
Fondly,
Tricia
Tricia, you always have the COOLEST ideas! So simple, but I would never come up with this on my own. I need to practice using a craft knife, this is such a neat page embellishment!
ReplyDeleteWhat an lovely and elegant way of using ribbon, stamps, stencils, ink and a craft knife. Love it.
ReplyDeleteSuper cute. Love the idea of threading the paper through. Great photos.
ReplyDeleteThats just beautiful! Thanks for showing us how to make. :)
ReplyDeleteWell Tricia, first off, I am honored to be on your layout with Brenda. (blushing)
ReplyDeleteAnd the use of the stencil, stamp, ribbon technique is just gorgeous. I am definitely going to have to try that. Thanks!
I too would never have thought of doing that but that's why you are the creative goddess that you are! (Well and Jac too!) Love Love the color combos for this kit and how great they go with pictures from that night! What a coincidence!
ReplyDeleteYou sure know how to use stencils, that is a beautiful border. A beautiful page !!
ReplyDeleteWhere did you get your PhD in papercrafts? As usual, a creative way to add more oomph to a plain sheet of paper. Gorgeous!
ReplyDeleteI received my PhD from the esteemed School of Willing to Mess Up Until Getting it Right. I graduated with honors. :)
DeleteRed is my favorite color - I love the border!
ReplyDeleteI love the paper ribbon border technique . . . ingenious! All the little details of the finished page really take it to the next level. I will be CASE-ing for sure!
ReplyDeleteOh, Tricia,that border is just awesome! I am so glad I ordered the stencil. Your finished page is stunning and I love the pictures.I so missed being with you all (even though Spain was great!)
ReplyDeleteWonderful layout! Thanks for sharing how to make the ribbon border.
ReplyDeleteYour clever mind just keeps going and going! This is so lovely. Is your PhD in Accelerated Efficient Fabulous Mastermind Creating?
ReplyDeleteI do love those retreat photo overlays as well, and the bonus of having the year artistically placed on the photo is great. Lucky we have Jac, the graphics master to supply me so I can just add her work to the great pic :) It all makes for a great 12x12 holding great memories of retreat here!
OMG - this is just too cool. And you had me hooked up until you used the phrase craft knife! Just kidding - thanks to you, I am getting less and less intimidated by that evil nemesis!
ReplyDeleteThis is a great idea. I too am not a lover of the craft knife, but think I will try this. I have just ordered the stencil to come with my next shipping and now I have this wonderful step by step guide to help me. Thank You.
ReplyDeleteWe aim to please, Becky! I should do a whole video on craft knife tips! :)
DeleteLove this idea Tricia! I now love this stamp more than ever!
ReplyDeleteCute LO, love how you created the border with the stamp!
ReplyDeleteWhat a great idea!! That stencil is a must have - such a great technique.
ReplyDeleteThanks for sharing!
Love the beautiful woven paper through the stamped image. Have a great day Tricia!
ReplyDeletereally great idea! So pretty!
ReplyDeleteStunning in Red! I love the paper ribbon idea for a really pretty layout, love the comment about the eraser too.
ReplyDeleteThat'S AWESOME!
ReplyDeleteBeautiful boarder technique with the stencil and stamps! Great layout!!!
ReplyDeleteAbsolutely beautiful!
ReplyDelete